The installation and adjustment of the device must be done while the shotgun is unloaded!
XD Solution Setup Instructions
We are currently selling one universal, one-size-fits-all version of XD Solution: XD Universal Plus. Older, discontinued models are the XD Adaptable and XD Basic.
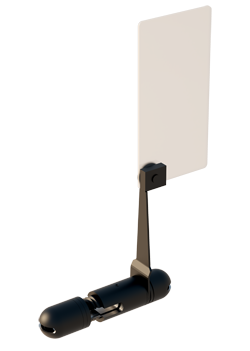
The XD Universal Plus was developed thanks to the valuable feedback of our clients! It is very easy to attach to the trigger guard, it needs little to no assembly, it easily adapts to most shotgun types, and it has an elegant chrome finish. Its blade height can be adjusted by raising or lowering the base along the trigger guard.
The XD Adaptable (discontinued) was black and came with two blade holders (short and tall) and 3 sets of blades. It was available in a front grip or bottom grip version, the latter being best for pump action or semi-automatic style shotguns.
Bottom grip
Front grip
The XD Basic (discontinued) was the first model. It was not adaptable but was available in different sizes for each major shotgun type (over and under standard/step up rib, over and under sub gauge, side by side standard/step up rib, side by side sub gauge, pump action/semi-automatic).
Pump / Semi-auto

Standard
Assembly and Mounting
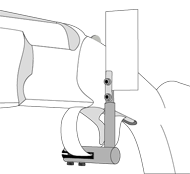
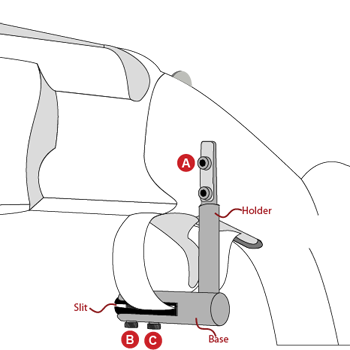
XD Universal Plus
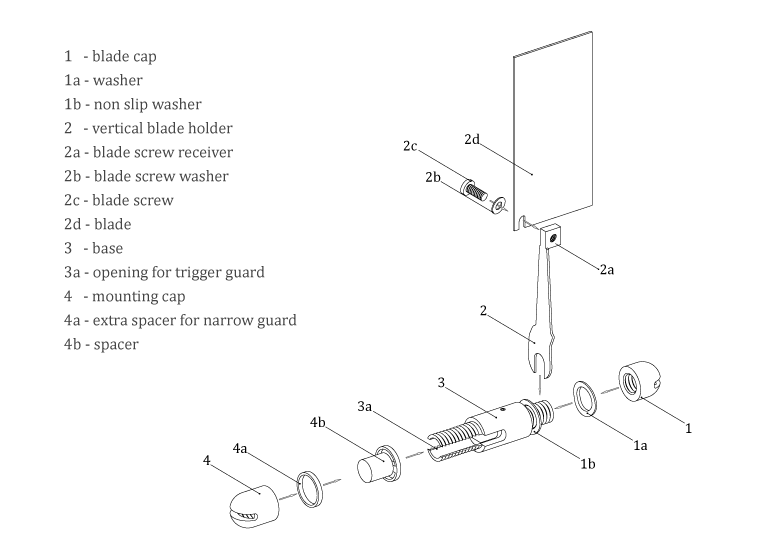
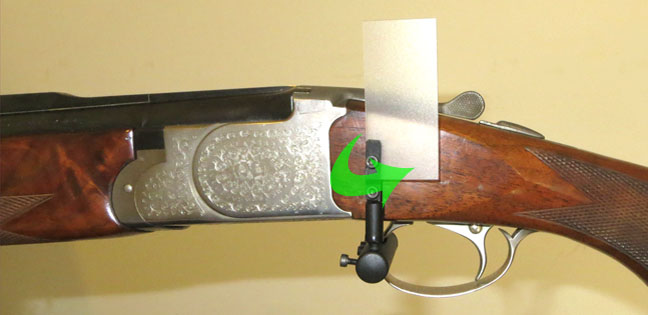
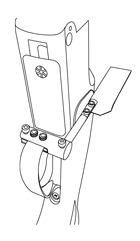
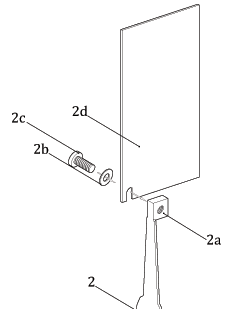
- Skip this step if your holder is already mounted. Partially unscrew blade cap 1, mount holder 2 vertically (as shown above) and then tighten the cap by hand.
- Unscrew mounting cap 4, and slide out spacers 4a and 4b. Note that 4b has a plastic extrusion which fits into opening 3a.
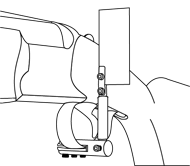
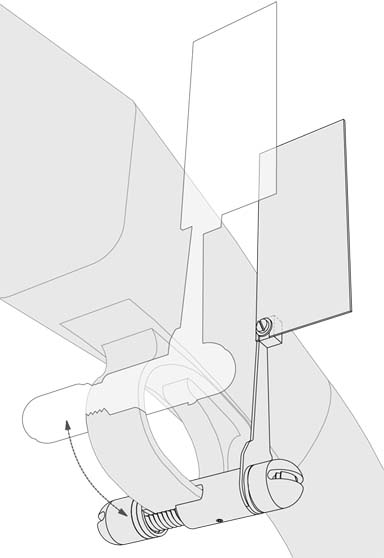
- Take the XD and slide opening 3a from side to side onto the trigger guard, close to the underside of the gun. Holder 2 should be by the side of the gun corresponding to the cross dominant eye. If the top of the holder is above the rib line, slide the XD down along the trigger guard. Rotate holder 2 so that it is vertical.
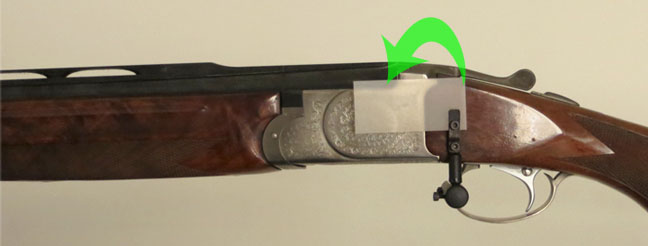
- Put spacers 4b and 4a back on, and screw cap 4 on by hand. Remove spacer 4a if there isn't enough space for cap 4 to screw on properly.
- Select the correct blade for your sight.
- Once you find the correct blade, screw caps 1 and 4 on using the flat metal key from the pack or a coin, so the XD is fastened and can no longer move along the trigger guard.
XD Adaptable (Discontinued)
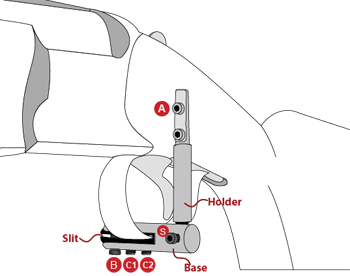
- Take the blade holder and insert it into the large hole of the base. Make sure the holder is fully inserted and screw A aligns with screw S. Tighten screw S until the holder is fixed. The large holder is best used for high rib shotguns.
- For the front grip version, remove screw B completely, fully insert the slit of the base onto the trigger guard as close as possible to the underside of the shotgun. Bring it lower if necessary so that the blade holder is vertical. For the bottom grip version, remove screw B completely, then fully insert the slit of the base onto the lowest part of the trigger guard. Slide the device forward as much as possible, but make sure the holder is vertical.
- Reinsert screw B and tighten it but make sure it does not come out on the other side.
- Tighten screws C1 and C2 until the base is fixed.
- Select the correct blade.

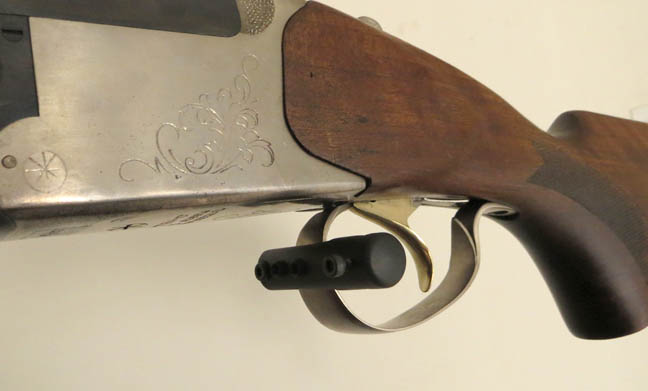
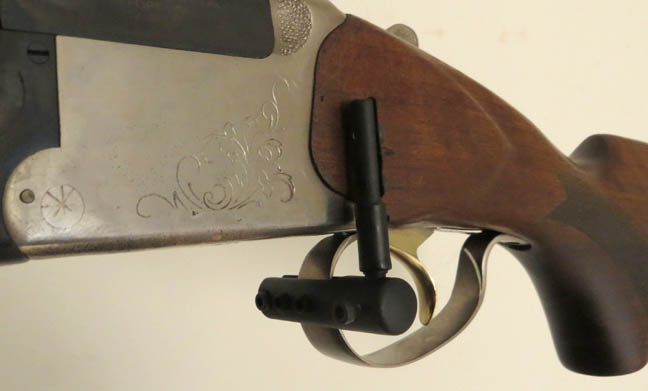
Front grip version
Bottom grip version
XD Basic (Discontinued)
- Remove screw B completely.
- For the front grip version, fully insert the slit of the base onto the trigger guard as close as possible to the underside of the shotgun. Always make sure the blade holder is vertical. For the bottom grip version, fully insert the slit of the base onto the lowest part of the trigger guard. Slide the device forward as much as possible, but make sure the holder is vertical.
- Reinsert screw B and tighten it but make sure it does not come out on the other side. Steps 1-3 are best done with the shotgun held horizontally and upside down. Do not force screws B and C.
- Tighten screw C until the base is fixed.
- Select the correct blade and mount it on the blade holder.

Front grip version
Bottom grip version
Selecting the Blade

Incorrect Blade
Correct Blade
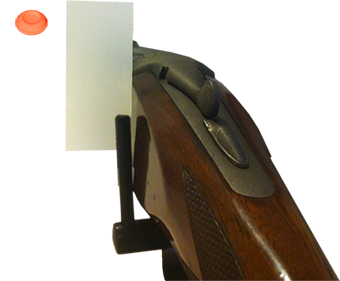
Blade Selection for XD Universal Plus
- First find the correct blade height. Take the shortest and narrowest blade out of pack 1. All blades from one pack have the same height.
- Put the perforation of the blade around screw 2c so the blade is sandwiched. Lightly fasten screw 2c using the special corner of the key provided, then pick an object 15-20 yards away as a target.
- Mount the shotgun and look at the target with BOTH eyes open. Do NOT try to see the target above the blade. If you see a double image of the barrel, take the narrowest blade from pack 2 and repeat. If still not high enough, slide the XD up along the trigger guard, or test the narrowest blade from pack 3. The height is correct when you no longer see the double barrel image. Don't let the base touch the underside of the shotgun — heat might discolor it. If blades are too high, mount the XD lower or trim the blade.
- Next check the width. Mount the shotgun, close your cross dominant eye (next to the barrel) and look at the target. Make sure the barrel is leveled.
- Keeping the shotgun still, open your cross dominant eye and close the non-dominant one (above the barrel). The target will appear shifted.
- Look at the shifted target with your cross dominant eye. If you can see a portion of the barrel not covered by the blade, take the next widest blade from the same pack and repeat steps 4-6. Test until you no longer see the barrel but can still see the shifted target.
- Fasten screw 2c well and you're all set.
Blade Selection for XD Adaptable
- Out of the three stacks of blades, take the shortest and narrowest blade. All blades from one stack have the same height.
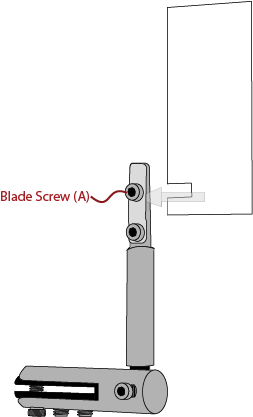
- Loosen the blade screw (A). Insert the blade so the small cut-out fits around the screw. Make sure the blade is vertical and sandwiched between the metal components.
- Pick an object 15-20 yards away as a target.
- Mount the shotgun and look at the target with both eyes open. Do not try to see the target above the blade. If you see a double barrel image, go to the next tallest stack, take the narrowest blade, and repeat. If no double image, continue to step 5.
- With the shotgun mounted, close your dominant eye and aim at the target. Make sure the shotgun is leveled.
- Open your dominant eye and close the non-dominant one. Maintain your mount even if the target appears shifted. If you can see barrel by the outer edge of the blade, take the next widest blade from the same stack and repeat. Do not try to see the barrel or target above the blade.
- Once found, tighten the blade screw (A) until fixed.
Blade Selection for XD Basic
- Take the narrowest blade.
- Loosen the blade screw. Insert the blade so the small cut-out fits around the screw. Make sure the blade is vertical and sandwiched between the metal components.
- Pick an object 15-20 yards away as a target.
- Mount the shotgun, close your dominant eye and aim at the target. Make sure the shotgun is leveled.
- Open your dominant eye and close the non-dominant one. Maintain your mount even if the target appears shifted. If you can see barrel by the outer edge of the blade, take the next widest blade and repeat. Do not try to see the barrel or target above the blade.
- Once found, tighten the blade screw until fixed.

3 Ways to Store Your Shotgun with XD Solution
Option 1: Remove the Rod and Blade
- Loosen the screw that fastens the blade rod.
- Remove the rod with the blade and store it in a familiar location.
- Leave the base on the trigger guard and store with the shotgun.
The base fits almost completely under the shotgun and should not interfere with most storage means.
Option 2: Remove the Blade Only
- Loosen the top screw of the blade rod so you can remove the blade.
- Store the blade in a familiar location.
- Store the shotgun with the rest of the XD device mounted.
Option 3: Turn the Blade
- Loosen the screw that fastens the blade rod.
- Without removing the blade rod, pivot the blade flat against the side of the shotgun.
- Lightly fasten the screw so the rod doesn't fall out.
- Pivot only the blade and turn it down 90 degrees.
- Store your gun with the XD mounted this way.